Strength Training At Home
The benefits of strength training range from weight loss to improved mood, better sleep to increased energy, increased confidence to decreased joint pain. Joints that tend to get cranky, like knees, hips, shoulders, and elbows, typically start to feel much better as the muscles around them get stronger.
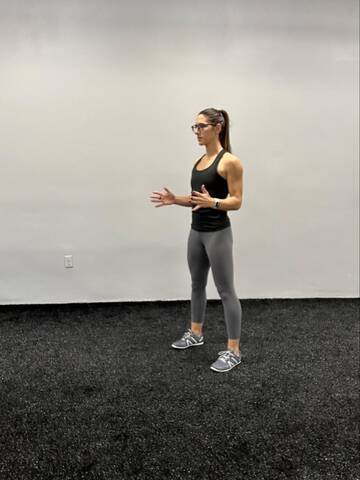
Sounds great, right? But, what about the hours of extra time you don’t have, the expensive gym memberships, the pushy sales people in the gym? What if you don’t need any of that? The exercises outlined here will offer you the strength training routine you want, without all the extras. All you will need for these exercises is about a yoga-mat-sized area of space, and you may find it helpful to be close to a wall or have a chair nearby.
Don’t let the barriers to strength training stand in the way of better health. Remove those barriers and start your strength training regimen at home with these 4 simple, scalable exercises!
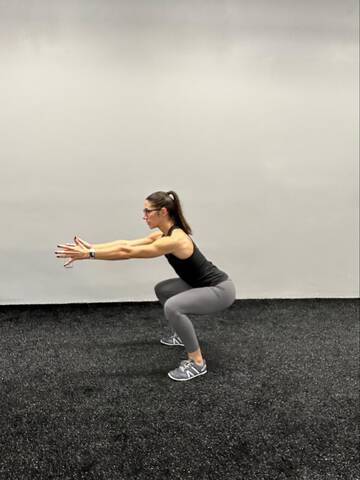
Squat
How do you do it?
Stand with your feet about hip distance apart. By deeply bending the knees, bring the hips down between the knees, aiming for thighs parallel to the floor. Stand back up. Mastering the depth of the squat can take time, so be patient with yourself. To get started with squats, you will want to aim for 1 to 3 sets of 8 to 10 repetitions.
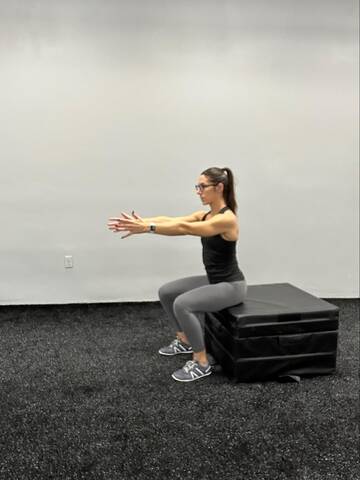
Beginner:
If you are feeling uneasy with the depth, you can use a chair or couch to squat towards to help you. Squatting to any depth will help you build strength in the lower body. If you are unable to get your thighs parallel to the floor, go as low as you can comfortably and work on more depth over time.
Advanced:
Once you’ve mastered the depth of the squat, can you find a household item to hold in your arms for a weighted squat? Perhaps your toddler or water jug would work in place of a weight here.
What are you strengthening?
Squats work to strengthen the major muscles in the legs, including the glutes, hamstrings and quads.
Why do it?
Squats should be a staple in your strength training because they work the large muscles of our legs. Squats are functional in our everyday lives as we get in and out of chairs or up and down off of the ground.
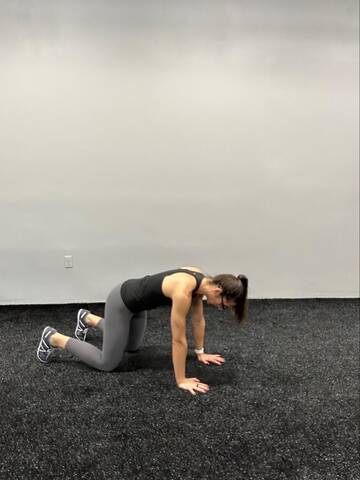
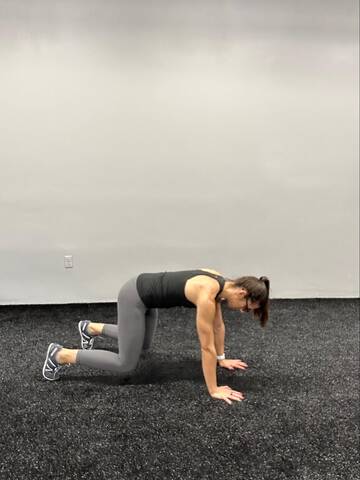
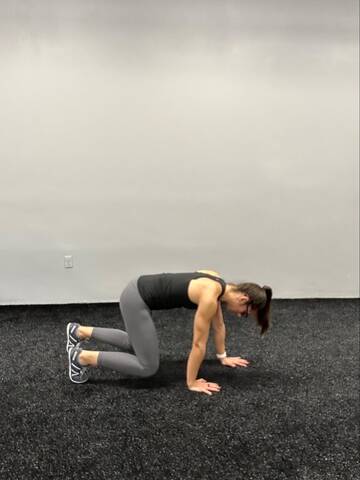
Bear hold
How do you do it?
Start in a quadruped position (hands and knees and feet all on the ground). Then use the strength of the core to lift the knees off the ground, hold knees bent and hover them just a few inches off the ground. Start with 2 or 3 breaths in this hover, working your way up to 10 consecutive breaths. You can practice this hold several times throughout your day, or you could perform 3 to 5 sets of the hold as part of your workout.
Beginner:
If lifting the knees feels too challenging, try engaging the core from the knees down position. To do this, we want to think about the upper and lower body working together. Press down with the arms and simultaneously, draw forward with the knees. Working on squeezing everything inward will help activate the core in this position.
Advanced:
Feel confident and strong in your bear hold? Once you’ve mastered the bear hold, add a crawl! From your bear hold, move the opposite arm and leg forward to start the crawl. Keep your knees low to the ground (but not touching the ground) as you start moving.
What are you strengthening?
The bear hold focuses on building core strength as well as increasing proprioception. Proprioception is our brain’s understanding of how the body moves in the space around us.
Why do it?
Core strength and proprioception together will help improve balance, decreasing fall and injury risk.
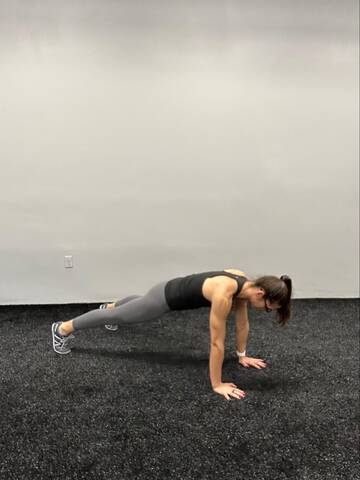
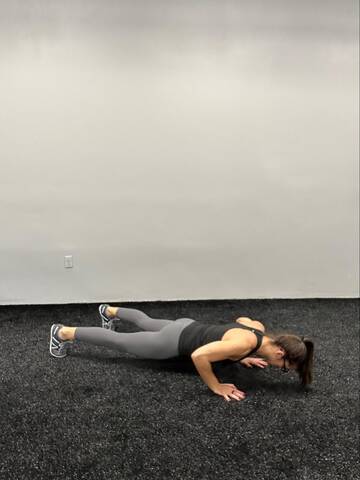
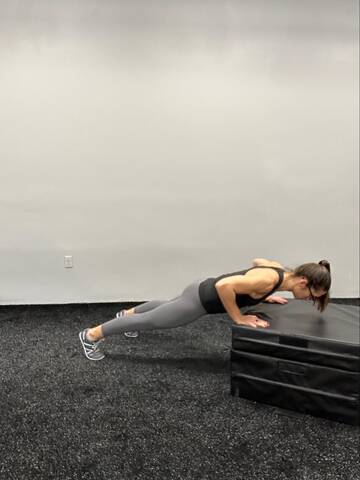
Push up
How do you do it?
Starting in a quadruped position (on your hands and knees), extend your legs straight back behind you, knees off the floor. Hands should be about shoulders distance apart, while feet should be about hips distance apart. Hands and toes will be supporting the weight of the body. This starting position is also known as a high plank. Once you are there, keep your body straight and bend only through the elbows; elbows aim to be about 45 degrees away from the torso. Lower your straight body as close as you can to the floor before pushing up and back into your high plank. Move at a moderate pace where you feel controlled. The goal with our push up is to maintain a strong, straight body as the arms work.
Beginner:
If push ups from the ground feel too challenging or you are unable to do a push up while maintaining a straight body, try elevating your hands. Hands can be elevated onto a wall, countertop, couch, etc., putting your body at an upward angle instead of parallel with the floor. With the hands elevated, make sure you are still prioritizing a strong core. You’ll know your core is engaged if you can maintain a straight line from shoulders to heels.
Are you wondering where kneeling push ups belong? Our advice: skip them! A kneeling push up is rarely a successful step in the push up programming. It is often too challenging to maintain the proper form, therefore, we are not engaging and strengthening the proper muscles. Elevating the hands will help you progress to your first push up faster and with less chance of injury.
Advanced:
Want to make your push up harder? Try elevating the feet! Use a chair, couch or stairs to create the downward angle. If declined push ups aren’t for you, push ups can also be made more challenging by doing the motion at a slower pace.
What are you strengthening?
Push ups feel like they are primarily working the muscles of the chest and arms, which is true. We also get a tremendous amount of work through the core as we maintain that straight body position.
Why do it?
Upper body strength is crucial in our everyday lives. With a push up, routine things like carrying groceries, handling your luggage and maintaining safe healthy posture will get easier.
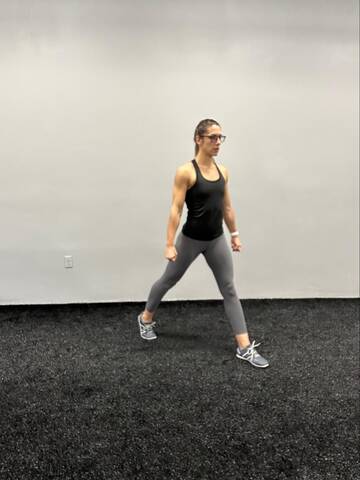
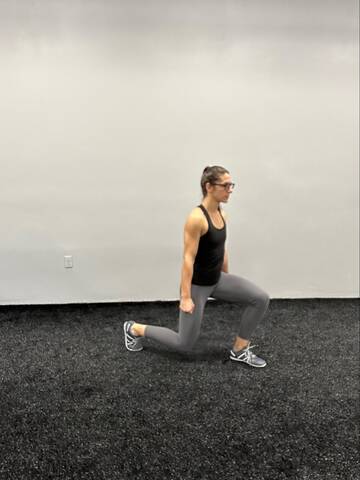
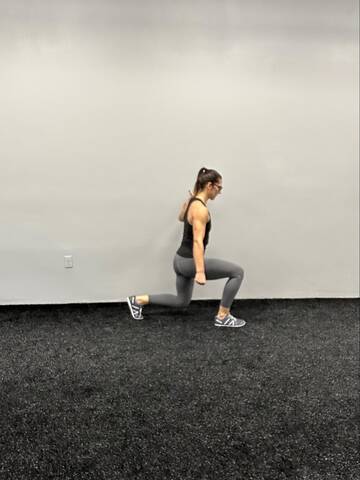
Split squat
How do you do it?
Starting with feet hip distance apart, take a large step back with one foot; this is your starting position. You will bend as deeply as you can through both legs, until the back knee taps the ground, and then you’ll stand back up. Your feet will stay planted throughout. You will repeat this on the same side, working your way up to 8 reps per side. If your knees get sore in the split squat, try thinking about squeezing the front and back legs together as you move.
Split squats can be challenging on the knees, especially if you have a history of knee problems or you are new to exercising. If your knees tend to be problematic or this exercise doesn’t feel right on the knee joint, you might find it beneficial to focus more on regular squats for now!
Beginner:
If your balance is a struggle in your split squat, use the wall for support. If you are using the wall for support, stand with the wall to your shoulder and place the opposite hand to the forward leg on the wall beside you. This should assist with balance and help your form. If starting at the top (standing up with two straight legs) isn’t working for you, you can also try your split squat from the bottom, starting with both knees bent and back knee on the ground.
Advanced:
Mastered your split squat? Try turning this into a reverse lunge by adding a step back and forth between each repetition.
What are you strengthening?
Split squats, like all squats, are working the large muscles of the legs—including the glutes and quads, as well as hamstrings. We do both squats and split squats here because split squats have the added benefit of challenging our balance.
Why do it?
Split squats are functional in our everyday lives, including any time you are getting up or down off of the floor or climbing a flight of stairs.
Now what?
Practice these exercises! This list of at-home strength training exercises has been curated through years of working with real people—watching real clients develop strength, consistency and a love for strength training without spending all their free time in the gym.
If time is a barrier to you, start with one round of each exercise right when you wake up. Now, can you do it in the morning and the afternoon? Your strength training doesn’t have to be done for a straight hour. Breaking up your routine throughout the day can have its own benefits. Consistency is key when starting a new strength training routine. Find a way to build these exercises into your day. A good place to start would be 20 to 30 minute sessions a few times a week, allowing yourself at least one day between workouts to recover. Strength training is important, but your gym membership might not be.
If these exercises don’t work for you, or you have additional questions about strength training or training at home, please contact Rachel at Fueling Strong. Fueling Strong offers in person personal training and classes as well virtual personal training and online classes.